HOW TO USE
The following is example of how to use RPC-SP2.
SECURITY
The RPC-SP2 is protected against unauthorized access with a encrypted password.
The password can be composed with 4 to 8 figures number, alphabet, and number + alphabet.
The password can be composed with 4 to 8 figures number, alphabet, and number + alphabet.
 #Password input window
COMPOSITION AND FEATURES OF THE EMBEDED WEB UI
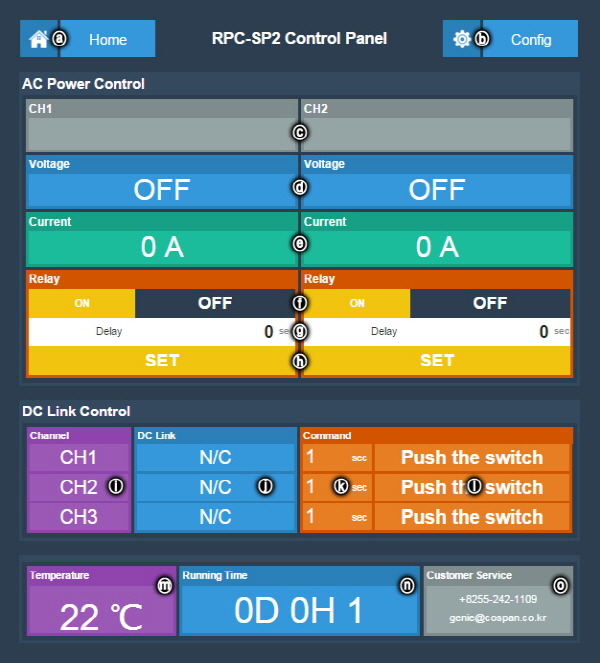 #Main web UI for control and monitoring
The user can control electric power into the connected devices and monitor the operating status of devices.
| FEATURES | |||
| ⓐ | Move to main web UI | ⓗ | Set the auto-switching on time |
|---|---|---|---|
| ⓑ | Move to config network web UI | ⓘ | Channel name of DC Link |
| ⓒ | Channel name of AC power outlet | ⓙ | Connecting state of DC Link |
| ⓓ | Electric status of power outlet | ⓚ | Set the DC Link time |
| ⓔ | Current per AC power outlet | ⓛ | Switch ON the DC Link |
| ⓕ | Switch On/Off & status | ⓜ | Temp. sensor data |
| ⓖ | Input the auto-switching on time | ⓝ | RPC-SP2 running time |
1. Switch ON/OFF
: Control the switch ON/OFF status per each electric AC power outlet
① Check the Power outlet channel(ⓒ)
② Click to one of switch ON/OFF(ⓕ) to control
The white letters on a black background is the switch status
Electric safety circuit
- Electric fuse and circuit breaker
- Display warning message over 10A current per each outlet
- Shut down electric power of outlet automatically over 12A current per each outlet
2. Auto-Switching On
: Auto-switching on the electric power outlet on time without switch control manually.
① Check the Power outlet channel (ⓒ) to control
② Input number to set time for auto-switching on (ⓖ)
③ Click “Set" button(ⓗ)
"* Set time of "0" : Non use of "auto-Switching On" function
* Available set time : 0~99 sec.
3. Monitoring sensor data
: Monitoring an integrated temperature sensor into the RPC-SP2 and the additional other sensor which is connected to the RPC-SP2.
ⓜ Internal Temp. : Integrated temperature sensor data
It is can be changed to other sensor data display in depends on user requirement (Customization).
SETTING NETWORK INFORMATION
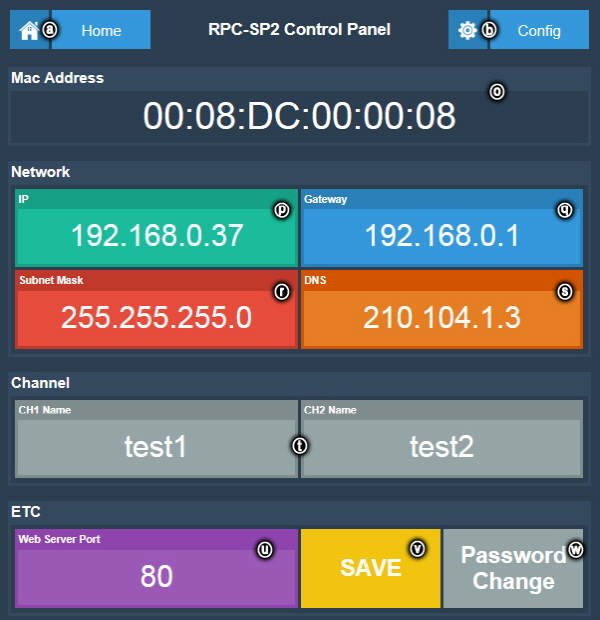 #Main web UI for config network
Set the network information for user own network connection.
| FEATURES | |||
| ⓞ | Display to MAC address | ⓣ | CH name display & input |
|---|---|---|---|
| ⓟ | IP address status & input | ⓤ | Web server port status & input |
| ⓠ | Gateway status & input | ⓥ | Save the entered information. |
| ⓡ | Subnetmask status & input | ⓦ | Change the password |
| ⓢ | DNS status & input | ||
* Setting Network
: User can set the network information to the RPC-SP2 for user own network connection.
① Input the new IP(ⓟ), Subnet Mask(ⓡ), Gateway IP(ⓠ), DNS Server IP(ⓢ), web server port(ⓤ)
② Click “SAVE” button(ⓥ)
* User can change a web server port number for user own connection.
(Factory default web server port is "80")

COSPAN
ADDRESS : #305 Mechatronics-dong, GNTP, 65, Jungrigongdan-ro, Naeseo-eup, MasanHoewon-gu, Changwon, Kyungsangnam-do, 51234, KOREA
TEL : +82-55-242-1109 FAX : +82-55-242-1105
COPYRIGHT (C) 2014 BY COSPAN. ALL RIGHT RESERVED.
ADDRESS : #305 Mechatronics-dong, GNTP, 65, Jungrigongdan-ro, Naeseo-eup, MasanHoewon-gu, Changwon, Kyungsangnam-do, 51234, KOREA
TEL : +82-55-242-1109 FAX : +82-55-242-1105
COPYRIGHT (C) 2014 BY COSPAN. ALL RIGHT RESERVED.